menu
giveaways ad
Thursday, July 31, 2014
Wednesday, July 30, 2014
How to Fold Fabric with Comic Book Boards
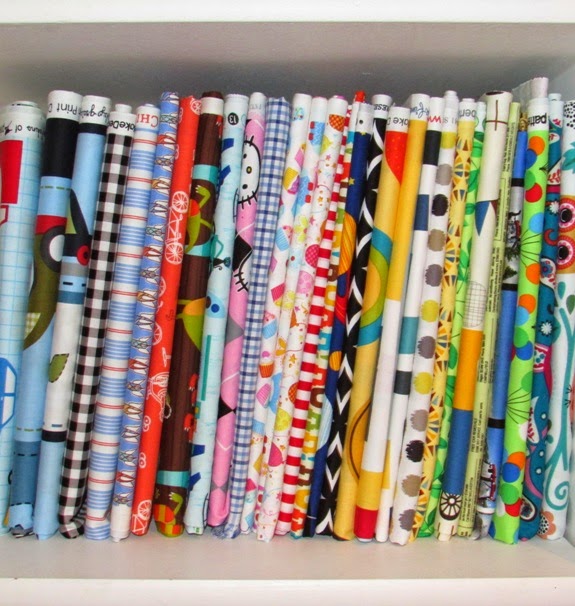
Have you ever seen a photo of someone's fabric stash and wondered how in the world they got it to stand up on a shelf like that? If your stash is anything like mine used to be, it can be a little bit scary. Monstrous piles that are half-folded, toppled and smooshed, and then picked through by the kiddos. Sound familiar? Well guess what. It's actually really easy to organize fabric like the photo above and you can do it too. Here's the secret:
Tuesday, July 29, 2014
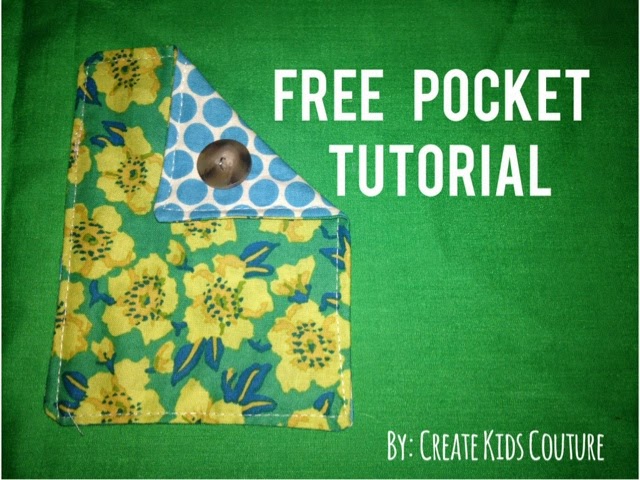
How to Tuesday: Free Pocket Tutorial
I recently saw a pocket similar to the one below on a skirt at a local store. Needless to say I fell in love with it and have been dying to add them to one of my projects. So let's get started!
Monday, July 28, 2014
All About Needles
I do a lot of sewing and normally I don't have any trouble with my needles but the past two weeks I have broken FOUR needles!
Thursday, July 24, 2014
Boutique Basics: Opening a Facebook Fan Page
We come across quite a few new and established
boutiques on our Facebook group that do not have Facebook fan pages. We thought
that this would be a great topic for the next entry in our “Boutique Basics”
series.
Wednesday, July 23, 2014
Putting a Yoga Waistband on Shorts and Pants
Katie Skoog is the head of our baby girl's department at CKC, and today she has a tutorial for us that has been requested many, many times! And this one's not just for the little girls - it is perfect for you and me too! Here's Katie:
How To Tuesday: Peek-A-Boo Straps
We have so many creative ladies in the CKC family and when Kaci shared two of her recent creations I knew I had to do a tutorial on this.
Monday, July 21, 2014
Gathering Thick Layers by Hand
Gathering fabric is a useful skill, especially if you love ruffles as much as we do! Modern sewing machines have made it pretty easy for us to gather ruffles, whether we have a basic sewing machine or a super fancy serger with a ruffle foot. Whichever method you normally use (or maybe you are just learning) I think it's a good idea for us all to know how to gather by hand as well. You never know when we might be stuck on a desert island with yards of ruffles to gather and no sewing machine in sight...
Thursday, July 17, 2014
Boutique Basics: Selling on Etsy
We see a lot of posts in our Facebook group asking
for help in establishing or enhancing Etsy stores. We thought this would be
a great topic for the next entry in our “Boutiques Basics” series! Click on the
links to access the previous Boutique Basic posts if you want to catch up:
Stitch Box Winner!
Thank you to everyone who entered our Stitch Box Monthly Giveaway! The winner has been chosen randomly and it's time to announce the lucky new owner of a Stitch Box! Drumroll please...
****
The winner is Alicia Jasper! Congratulations! Please email us to claim your prize: ckckristen@gmail.com
****
The great news is that we can all still order from Stitch Box Monthly using the coupon code "ckcstitchbox" to get 10% off our first order! I truly LOVED receiving my Stitch Box in the mail: High quality fabric, patterns from various designers, and all sorts of cool little gadgets that I didn't even know I wanted! We can subscribe to one month, three months, six months, or even a year at a time. (Remember, a 10% discount goes a lot farther on larger amounts!) Have some fun browsing their website to see what has been offered in the past and I'm pretty sure you'll fall in love.
Wednesday, July 16, 2014
Fan of the Month: Tia Kluesner
Congratulations to Tia Kluesner, our CKC Fan of the Month for July!
I can't wait to show you the stunning project she put together for her little niece.
Tuesday, July 15, 2014
How To Tuesday: Sunglass Case
My kids know the drill. We scramble to get ready, throw on our shoes, and then everyone piles into the car, hoping that we can make it to our destination on time. But then, hold on! Mom has to run back into the house to get her sunglasses.
It happens every time! And I know what you're thinking. "Why don't you just leave your sunglasses in the car?" I don't have a good answer for that. I guess that when I get home all I can think about is getting my monkeys back into the house. But now I *think* I have a solution!
Monday, July 14, 2014
Retro Headband Tutorial
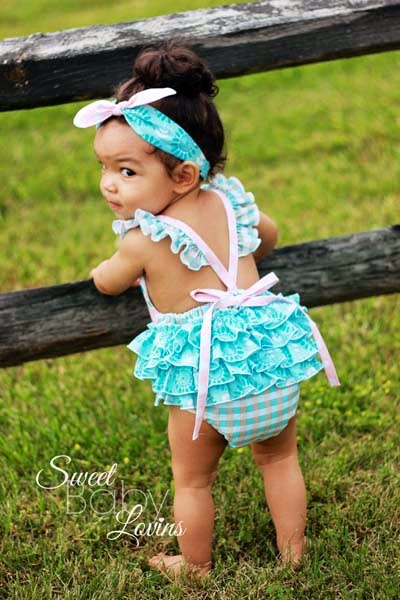
When I first saw the picture above I noticed three things:
#1 A super adorable baby. Am I right?
#2 The cutest little ruffle bum outfit ever.
#3 Her super precious retro headband. So cute!!
And that's when I knew I had to learn how to make that headband asap!
This outfit and headband (and baby, in fact) were all made by Leah Ann Gardner from Sweet Baby Lovins. Leah is a tester for CKC's baby clothing and today she has agreed to teach us all how to make a retro headband. Isn't she wonderful?! Here is Leah with today's tutorial:
Retro Headband Tutorial
Thursday, July 10, 2014
Stitch Box Monthly Giveaway!
There are two kinds of people in the world. Those who love Stitch Box Monthly and those who have not tried them yet.
I have tried them and today I'm so excited to show you what I received! And even better -- at the end of today's post we have a giveaway for a ~~FREE~~ Stitch Box for one lucky person! Trust me, you want to win this!
If you haven't heard of Stitch Box Monthly, the basic idea is that you subscribe to receive a box of sewing goodies (quality fabric, patterns, tools, notions, etc.) and then each month Katie at Stitch Box Monthly sends you a box full of glorious surprises! Each month is different and you can browse her website to see what she has sent out in recent months.
This is what the contents of my box looked like. So much good stuff in there! You may recognize the adorable Moda fabric from yesterday's blog post! There's even enough left to make a matching ruffle skirt for her doll.
On top of the polka dots you can see a paper pattern from CKC - Aubrey's, which is one of my favorites! (It even has a CKC pen included - the kids aren't stealing this one from me.) On the bottom left of the picture is a card with a code on the back to download a Yoga A-Line Skirt pattern from Jocole for free. (It has already been paid for.) Stitch Box includes patterns from all different companies. I can't wait to see who it is next month!
As for the little goodies on the bottom right, I tore right into them the moment I opened the box! First of all, there is a double-needle for knits that will help with the yoga skirt. Soon I will be doing a blog post to show how a double needle is used on a single-needle machine. It's great for adding a professional finish to knit clothing. The next tool is a dual turner and it works way better than other ones I've tried - plus the rounded end can be used to mark lines in the fabric. Love it. And last but not least - did you know that there are fabric markers that come with an eraser?!?! I didn't, but now I do and I use it every day.
Now obviously Stitch Box Monthly didn't make all these cool items but she did gather them up and send me some awesome stuff that I never would have thought to go shopping for. It's like Christmas every month!
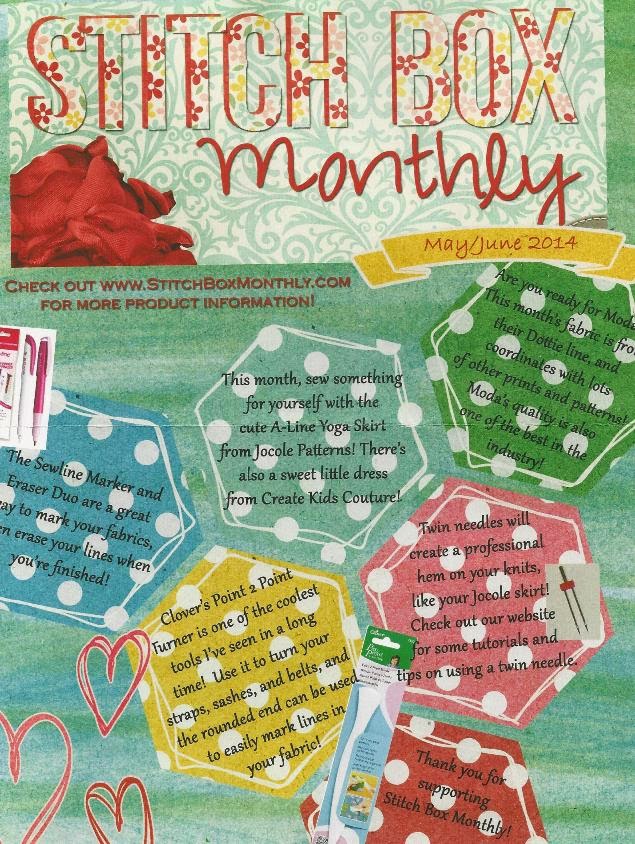
I also love that Katie included this list in the box that shows exactly what I received. I didn't have to do any research to know how to use them. Whew!
I think I am done gushing over my own Stitch Box, but if you want to see more photos and happy feedback, you can hop on over to the Stitchbox Monthly Fan Page here. Get all the latest updates and some hints about what will be coming in future Stitch Boxes!
To order a Stitch Box for yourself (yay!) go to the Stitch Box Monthly website here and be sure to use the coupon code "ckcstitchbox" for 10% off your first order!
Now it's time for the giveaway. Enter below for your chance to win a Stitch Box for FREE!
The giveaway ends on July 16 and the winner will be announced here on the blog on the morning of July 17. Good luck! And thank you to Stitch Box Monthly for donating this prize.
Time for me to go use the rest of my Moda fabric. My daughter can't seem to wait any longer.
Let's Create! ~ Kristen
Wednesday, July 9, 2014
Jeans to a Ruffled Skirt: Upcycle Tutorial
Today we have another great upcycle tutorial for you! I will show you how I took a pair of my daughter's jeans that had holes in them and turned them into a super cute ruffled skirt!
My daughter wanted three subtle "not too frilly" ruffles so that's what we did here. She loves it! I will show you steps for this exact skirt but keep in mind that there are hundreds of ways to make the skirt portion - more ruffles, less ruffles, longer, shorter, and any sort of embellishments. These skirts are a lot of fun to make! First let's learn the basics. Here we go!
Supplies:
A used pair of denim jeans/shorts that fit
Fabric for ruffles - I used 2/3 yard for size 8 as shown above
Optional embellishments
The first thing we need is a pair of jeans or shorts! I especially like to use ones that are already embellished - these were some of my daughter's favorites until they got holes in them!
Step 1: Cut the legs off the jeans 3-4" down from the the crotch. This is just an initial cut so don't be too picky about making it straight.
Tuesday, July 8, 2014
How to Tuesday: Fabric Coasters
If you're like me and the word "hostess" makes you immediately think of Twinkies (mmm...) or chocolate covered cupcakes with white icing drizzled into perfect swirls (ooooh...) then this post is for you! Today we're learning how to make a fabulous hostess gift! That is, a gift to take to a hostess! Now we're all on the same page. I think that when it comes to a hostess gift, a personal touch is always nice. Today Morgan is showing us how to make fabric coasters using scraps out of your stash! They will look great on your own table or wrapped up to give to your favorite hostess! Here's Morgan with our free Fabric Coaster tutorial:
You will need two 5"x 5" scraps of fabric and one 4.25" x 4.25" square of fusible interfacing, per coaster. The thicker the interfacing the better and you can also use fusible fleece.
To get started you will fuse your interfacing to the back side of one of the scraps of fabric.
With right sides of fabric now together, sew along all four sides leaving a one inch gap.
Flip right side out and pin the opening closed. Topstitch along all 4 sides.
Monday, July 7, 2014
Boutique of the Month: Missy's Munchkins
Today we are excited to announce our Boutique of the Month for July. Congratulations to Missy Chess, creator of Missy's Munchkins on Etsy! Missy has had her shop open for three years now and she offers handmade and embroidered boutique clothing from baby sizes on up to women's plus! I always love to see what cheerful outfits Missy comes up with, and today I get to share some of her creations with you. She has also agreed to answer some questions for us related to the success of her boutique. Let's get started!
Welcome Missy! Please tell us -- How did you get into
sewing and what got you to open your own boutique?
My husband and I found out we were pregnant with our second child when our first was only 6 months old. I was spending way too much money on hand-made baby items and decided I would give it a shot on my own! As it turns out, I am pretty good at it!
Being a mom and a
boutique owner is hard. How do you find the time to fulfill orders, create new
pieces, and just run a business in general?
Balancing everything is definitely a challenge!! I work during nap times and after bedtime. Recently my husband gave up his man cave and we turned it into my craft room! Awesome, I know! The room has toys and a TV to keep the babies occupied for at least a little while so mommy can work.
Run us through your
typical work at home day.
Every day is different! I try to spend either the babies nap times or the night time working on orders and then a little extra time if I want to make something for my own munchkins.
How many items do you
have currently listed in your shop that you used a CKC pattern
to create?
All but three! So I have thirty-five items that are CKC, I believe. And I am adding three more today!
Where do you find
inspiration?
Lots of times I find it on the internet. Seeing others' creations and loving parts of them is a huge inspiration! I also have a fabric addiction so the beautiful colors and patterns also inspire me.
What is your favorite
piece that you have ever created for your boutique?
Just because of the joy my daughter had when she saw it, I'm going to say my Sheriff Callie inspired outifit!
If you could go back to
when you first started your business and tell yourself about the most important
thing you've learned as a business owner thus far, what would it be?
Just keep swimming! It is not always easy, but if you love it, it will all be worth it!
Thank you, Missy!
Those definitely seem to be words that Missy lives by. I have always been inspired by her cheerful outlook and today it has been a joy to share her work with you. If you'd like to see more of Missy's creations, be sure to visit her at Missy's Munchkins on Etsy and her Facebook fan page to show her some love! We are proud to have her as our Boutique of the Month for July.
Let's Create! ~ Kristen
Thursday, July 3, 2014
CKC on Pinterest: Browsing Made Easy
Did you know that our CKC blog has 82 free patterns?! Plus on top of that we have 52 sewing tutorials and 23 helpful videos. And we add new ones every week! So how can you sort through all of these great resources to find what you want?! We have several ways to do it:
#2 - Click the "Tutorials" link at the top of the blog. It doesn't have everything in there but it's a little easier to navigate when you're mobile.
#3 - Ask in the CKC Patterns Group. We're happy to help! (Although we may not be as quick to respond as you searching for it yourself.)
And I saved my favorite method for last! --
#4 - Use Pinterest! Did you know that we pin **everything** to Pinterest? New releases, free patterns, tutorials, contests, sales, videos, everything! Just come find us on Pinterest and you can access all of our info from your Pinterest page or app! Follow us here:
As you can see in the photo above, we have all of our pins organized into clearly labeled boards that make it super easy for you (and me) to find what we're looking for! It's even a fun way to browse patterns when you're looking for inspiration.
Here's a peek at our Sewing Tutorials page. You can find all of our tutorials here, even the ones that were posted before you fell in love with CKC.
Click on the board for Free Patterns and you'll find everything from clothing to accessories to home goods. I loooove that we can see them all in a glance.
One of my favorite boards is the Videos page. You can watch our YouTube videos right from Pinterest. Just think, if you have been following our Serging 101 series, you can pin our videos to your own board for easy access when you need them! Then of course some of our videos are just plain fun. (Did you catch the one of Tiffany and Shannon dancing and singing?!)
As you can see, we have a lot of resources for you and we always want to make it easy for you to do what you love.
Let's Create! ~ Kristen
Wednesday, July 2, 2014
Tie a Perfect Bow Every Time
I love sashes and I love bows! That is, I love bows that are tied neatly. Not so much the ones that are uneven or twisted funny or smashed. It's not that I go around judging other people's bows. I probably don't even notice them when they're imperfect. But I think everybody notices when bows are tied carefully as a gorgeous finishing touch!
Furthermore, I've heard it said that girls' bows will always be messed up so we might as well not fuss over them. I completely disagree! While I love that my daughter runs and plays in her dresses, that doesn't have to mean that her bows end up falling out. I have a little trick for tying a perfect bow every time - one that turns out even on both sides and stands up to a good amount of abuse! And it's even simple enough that I have taught my daughter how to tie her own sashes this way. Are you ready to learn?
The process is really quite simple but I'm going to give a play-by-play just to make sure we're all on the same page. Keep in mind that I am right handed and if you're left handed you may want to do the opposite.
First take both ends of the sash and fold them together once, as shown in the photo above.
With the piece on the right, make a large loop going up.
With the piece on the left make another loop going up. Have one loop in each hand, both the same length.
Cross the two loops, as shown above.
Now we will tie the two loops in a knot, as shown in the photo above and the photo below.
With the loops in a knot, pull out on the loops until they are the length we want them.
Notice in the photo above that one of the tails is laying in front of the bow on the left and the other is in an awkward position on the right. In the next three photos I will show you what to do with the tails.
First take the tail on the left that's in front, and lift it up as shown in the picture above. Pull it down behind the loop it was covering.
The photo above shows that the left tail is now below/behind the left loop.
Do the same with the right tail, wrapping it around to a natural position so the tail points down without tugging on the loop.
With both loops going straight out and both tails going straight down, we can now pull on the loops to be sure they are snug and even.
And there you have it, a perfect bow! My daughter will undoubtedly smash it against a chair when she sits down, but the knot stays intact and the loops don't twist and come undone. Obviously even a perfect bow will still come undone if her teasing brothers decide to pull on it, but other than that our bow is pretty sturdy!
I'm sure there are other successful ways to tie bows and the important part is that the tails end up going downward without twisting the loops. I think my method was easiest for teaching my daughter, and it works especially well on short ties like Poppy's.
If you'd like an easy way to remember all the steps to this tutorial, I made a cheat chart for you to save on Pinterest! Just click on the red button on the image below.
Have fun tying those bows! No more need for twisted, smashed, crooked, or dangly bows. You can now tie them perfectly every time.
Let's Create! ~ Kristen
Subscribe to:
Posts (Atom)


+(1).jpg)
.jpg)


