social

Facebook Twitter Blogger Pinterest Instagram YouTube

menu

About Us Contact Us News Faq Tutorials Our Shop

giveaways ad

Thursday, August 28, 2014

CKC's First Annual Virtual World Fair!


We are so excited today to announce a CKC contest like no other!  It is our First Annual Virtual World Fair, and everyone is invited to participate!  It will work much like county or state fairs that you might have heard of or participated in, but in our Virtual World Fair there are no borders to worry about.  Finally you can earn ribbons for your gorgeous creations! And what's even better is that your entries will donated to help a wonderful cause.  Because your creations will be judged based on appearance AND your sewing skills, you will mail them to us where they will be judged in person and then they will be donated to a really great children's hospital to brighten the lives of the patients there.  Everyone deserves to feel pretty!  Note: Many of the outfits can be donated directly to children receiving care (we will definitely let you know when this happens!) and if any of the more over-the-top entries can't be received (determined by the staff there), those items will be auctioned off by us and the money donated. All proceeds go directly to the children receiving care. I have had close contact with this children's hospital and they are amazing. 


So let's talk details!  Please read all of the guidelines carefully. 

  • All entries must be made using one or more CKC patterns and it is okay to change the patterns if you'd like. 
  • There are 16 clothing categories to choose from.  You may enter only one item per category but you can enter as many categories as you'd like. 
  • Each individual entry must be accompanied by an entry form. **You can print the entry form here ** and then fill it out to mail with your entry. Be sure to fill in all the blanks. (Entries without a return address cannot receive ribbons.) 
  • All entries must be received by September 30, 2014 at the mailing address listed on the entry form. Please plan ahead so you can ship your items on time! Judging will take place on October 1 and any entries received after that deadline will still be appreciated as a donation but will not be judged. 
  • Entries will be judged on overall appearance, construction, sewing skills, etc. For helpful tips and an idea of what we will be looking for, you can read the blog post we did earlier this week on how to do well at state and county fairs. We intend for this competition to be fun and a learning experience for all of us so don't be afraid to enter!  We would love to have as many entries as possible. Plus your entries all go to a great cause! 
  • Winners will be announced on the blog and will receive ribbons for the top three places in each category, as well as some overall awards that will be given (see below). Ribbons and entry forms with judging notes will be mailed to the winners and participants. Please note that your entries will not be mailed back to you! They will be donated to Primary Children's Medical Center as described in the intro above. 
  • Note: We are not responsible for any entries that are lost or damaged during shipping or otherwise. We will, however, take great care of your items and be sure that all donations end up benefiting children at the hospital. 


The categories are as follows. Remember that you may enter only one item per category.

Girls Woven Dress
Girls Knit Dress
Girls Skirt
Girls Top
Girls Bottoms
Girls Top/Bottom Set
Girls Romper
Girls Sleepwear
Girls Outerwear
Girls Accessories

Boys Jumper
Boys Top
Boys Bottoms
Boys Special Occasion
Boys Sleepwear
Boys Activewear


Each category will have a first, second, and third place winner.  There will also be a "Best Exhibitor" award given to the person who earns the most ribbon points overall. Additional awards will be given across all categories, as determined by the judges. 

If you have any questions, please email kristen@createkidscouture.com

Remember, all entries must be RECEIVED by September 30, so you will want to start planning right away.  (It might be a good idea to go up and print off the entry form right now.) We are so excited to see your creations in person! Here's your chance to earn ribbons, show off your skills, and donate to children who could use a little extra sunshine in their day.

Let's Create! ~ Kristen 

Wednesday, August 27, 2014

Shopping for Knits


Jeanette's Ruffle Back Knit Dress

I know a lot of our readers are afraid to sew with knits and you may be one of them! While it's true that we need to do a few things differently when we sew with knits rather than wovens, I think you'll soon find that different is not bad!  Knits are fun to work with because they're soft, they don't fray on the edges, and they are even easier than woven to get that perfect fit in the outfit you're making. Basically the changes you make when sewing with knits is to use a lot of pins, lower your tension, and use a longer stitch! You can handle that! And with all the adorable dresses and outfits you could be making using knit, it's definitely time to learn so you don't have to miss out on them any longer.

Brenda's Bubble Sleeve Knit Top
  
Are you convinced? How about if we go shopping?! That's another fun thing about knits! You have more shopping to do! I do a lot of my shopping for knits online but I think if it's your first time using knit, it might be a good idea to go into a store and handle them up close. They're so soft and stretchy! I can't help smiling when I walk into the knit section!  When you go it does help to know what you you're looking for though, so wonderful Kaci put together a video for one of our sew-alongs awhile back, where she takes us right into the store and shows us the different types of knits.  So let's go shopping with Kaci! 


Wasn't that fun!?  


Cosette's Knit and Woven Dress

Now if you live far from fabric stores like I do or if you want more selection than you can find locally, I also love to shop for knits online. There are a lot of stores to choose from, both large retailers and small etsy shops, so don't be afraid to go searching for whatever knit prints and colors you have in mind.  To make it easy on you, we have gathered up links of some of our favorites:


If there is a particular print you have in mind that you can't find at the shops above, don't be afraid to do a search on etsy - there are a lot of small shops that have some really cute knits available! You can also check out Spoonflower.com, where you can actually design your own fabric including performance knit, but it does come out to be pretty pricey. I've had my eye on their Lego knit though and it's only a matter of time before I cave -- for the sake of my boys of course.  

So that's it. Have some fun shopping! And remember, when it comes to sewing with knits, you've got this! We have plenty more helps available on the blog (just type "knit" into the search box at the top) and of course you can always ask questions in the patterns group on facebook. It's time for you to fall in love with knits!  I know it won't take long. 

Let's Create! ~ Kristen 


Tuesday, August 26, 2014

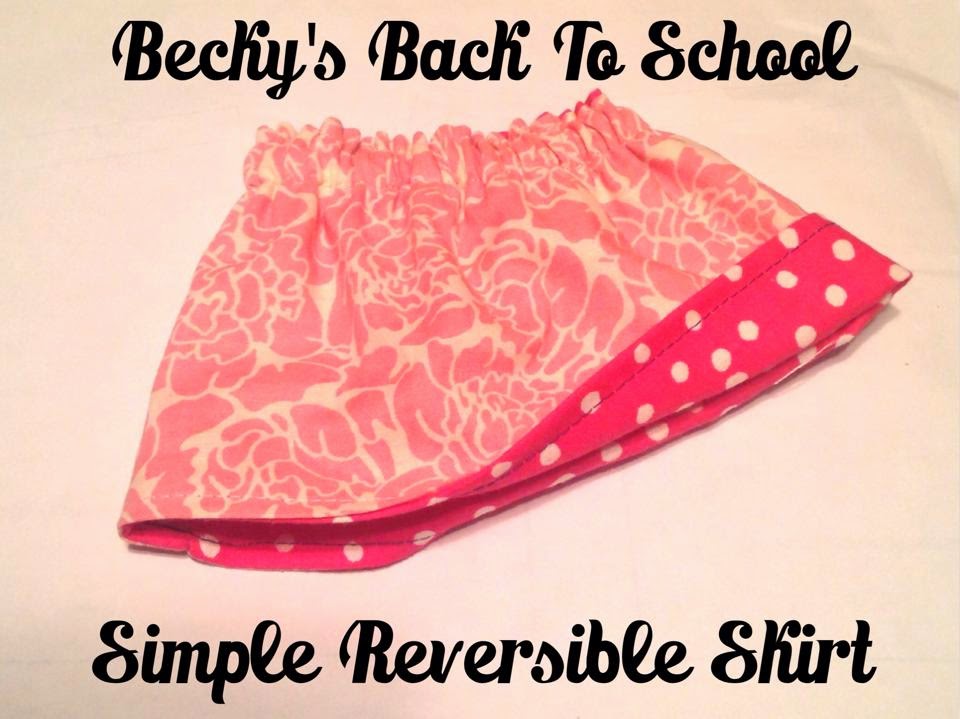
Becky's Back-to-School Free Reversible Skirt


School is now in session! 

Or at least if it's not already, it will be very soon!  It's an exciting time-- new teachers, new classes, new routines, and of course... new clothes!  We wanted to help you put together some quick little pieces for your girls so we have a new free pattern for you today!  You're going to love that this one is reversible and adorable without using a ton of fabric!


Isn't it cute?  She doesn't even have to know how quick and easy it was for you to make!  Just think of all the fun prints you can use to make several of these skirts - princesses, dwarves, snowmen (you know which ones I'm talking about), and simply put another cute fabric on the back and she can decide which mood she's in that morning!  It would also be really cute with a pinned on bow or flower. So many cute options from one simple - and did I mention FREE - pattern! 


Here is where you can download Becky's Back-to-School Simple Reversible Skirt.


We would love to see what you make with this pattern, so please share your photos when you're done! And yes, you can even use this for our Back-to-School photo contest! 

Let's Create! ~ Kristen 

Monday, August 25, 2014

How To Do Well at the County or State Fair!


 I am a competitive person. I'm not gonna lie. Don't get me wrong though -- I am peacefully competitive. I won't push the next guy over or get catty if I don't win.  But I do like a good contest and if I'm going to participate I want to give it 100%, nothing less. I mostly like competing because it pushes me to do better than I would have done otherwise. I like to improve. Oh, and it's also really fun to win. 

"Best Exhibitor" Clothing and Handwork, County Fair 

So what this has to do with you is that I'm here to give you some tips on how to do well in sewing competitions, specifically County and State Fairs. Luckily I live in an area where we have a great County Fair and they even have a Clothing Division!  I know not everyone has that opportunity but I think a lot of these tips are going to come in handy for sewing high quality boutique items as well, and also for participating in other clothing contests. (Hint: We have an exciting announcement coming up later this week!) Here are some tips that I came up with from my past experiences:


Thursday, August 21, 2014

Introducing Tosha, Our New Dancewear Designer!


Did you see the release of our new dancewear pattern today?  Tyra's Ruffled Tank is super cute and I know your little dancer is going to love it!


We're really excited about our new designer for dancewear at CKC, Tosha Smith, and I thought it would be fun to tell you a little more about her today!  You may remember Tosha from her guest tutorials on using knit shirts on Poppy's bodice and on making a halter top using a tee. Tosha caught our eye again when she posted unique dance outfits she was making for her daughters using adapted CKC patterns. We knew immediately that we had to have her on board!  In just a short while Tosha has already wow'ed us with her new designs and you might even get to see a few sneak peeks today, ssshh!  But first, I asked Tosha a few questions so we can all get to know her better: 


Welcome, Tosha!  Please start off by telling us a little about yourself!  

"Hi!  Well, to start off I am a mommy of two beautiful and talented girls. I have been sewing ALMOST as long as I've been with my high school sweetheart…ten years! My husband is my rock and I could not be living my dream of sewing and creating without him, he supports me a hundred percent! I am a huge family person so when I'm not sewing I'm spending time with my them! We live way out in the country so we're always outside riding 4-wheelers, playing with the dogs, BBQ'ing and just making memories!"


I love that!  And how long have you been sewing?

"I started sewing right after my oldest daughter was born. My mother-in-law decided to make her first Halloween costume and after I walked into the fabric store for the first time in my life, helped her pick out fabric, and watched her create the most adorable circus monkey costume I've ever seen, I was hooked! I borrowed her sewing machine frequently to practice and the next Mother's Day she bought me my very own! I haven't quit since!"


What a great inspiration! I'm sure you've learned a lot along the way. What made you decide to start designing your own outfits? 

"Well let's face it, dancewear is just plain expensive... and there's not a huge variety. I just couldn't stand to pay as much money as I was, just to have my daughter walk into dance class and match half the other girls there. She likes to be different! And now that she can be, all of her friends want something made too! Yay for me... like I'm not busy enough, lol!"


I bet!  Where do you find your inspiration?

"My daughter helps me a lot. She know what all the "cool" stuff is!  We look at the things in the dance stores and she says 'Mom, you could so make me this!'" 


What is your favorite part about designing for CKC?

"My favorite part of designing so far is just seeing my creations come to life! I love to see the smiles on all of the little testers and think, 'Wow, that really is cute!'"


I can definitely relate to that!  Is there anything else you would like to add before we finish up today? 

"Yes! I have to say that I am so excited to expand the selection of CKC dancewear patterns. With my daughter's experience in ALL types of dance I'm sure to offer at least something for all types of dancers! She dances ten hours per week and is currently on two competitive dance teams, one them being break-dancing! She loves ballet and just mastered a triple turn on Tuesday night!  Although my 3-year-old is not officially registered yet, they both have a tremendous love and passion for dance. I tell people all the time, "Dancing with the feet is one thing but dancing with the heart is another!" I cannot wait for all of my fellow dance moms to see what I have in store for your little dancers!"


Thanks so much, Tosha!  You are very talented and we love having you on board at CKC. I'm sure our readers will agree!


Now that we're feeling inspired, let's all go get Tosha's new Tyra's Ruffled Tank pattern and make some cute dance wear for our little girls.

Let's Create! ~ Kristen 

Wednesday, August 20, 2014

Using the Best Interfacing or Stabilizer for the Job

If you have ever gone shopping for interfacing or stabilizer, you know that there are a whirlwind of options!  It can be daunting to know which one(s) you need to buy if you don't know exactly what you're looking for!  But shopping for these products is not quite as complex as it seems and with a little info today I'm sure we can make your experience a lot better! I actually enjoy shopping for it now that I know what I'm looking for. 


Image Source

First let's talk about the difference between interfacing and stabilizer. For the most part, interfacing is ironed and/or sewn into the garment permanently to give it stability and structure (such as around buttonholes and collars). Stabilizers, on the other hand, are usually used temporarily to give structure underneath (such as with embroidering designs) and then after sewing they are torn out or removed by washing.  There are some exceptions but that is generally the case. The best way to know whether you want interfacing or stabilizer is to buy what the pattern calls for!  If it tells you to buy interfacing, then you should buy interfacing.  If it tells you to buy stabilizer then you should buy stabilizer.  You *can* substitute them for each other but you won't get the same results. 


Many of our CKC patterns call for "interfacing" without specifying which type. That is because it is often up to you! If your child likes a stiffer collar, you can use a heavier interfacing. If they like a softer collar, you can use a lighter interfacing. For me, it just depends on how much structure I want the interfacing to add.  I like to stock up on the packages above because they are easy to find (Walmart, etc.) and the packages are clearly marked with their type, weight, and best uses. This brand suggests the following:

Light: For Dresses and Blouses
Medium: For shirts, collars, and button holes
Heavy: For Jackets & Waistbands

That's pretty straight-forward info!  


If you want to buy larger sheets though, you can by interfacing and stabilizer by-the-yard at most fabric stores. It generally costs less that way too.  I do strongly recommend that you know what you're looking for before you get to the store! See if the pattern specifies exactly what you need and if it doesn't, have an idea of what you want before you go.  Ask yourself these questions:

Tuesday, August 19, 2014

How To Tuesday: Perfectly Mitered Corners

 At CKC as our library of patterns grows so does the desire to have many, many techniques in your kit and kaboodle as mom would say. Hi mom! So today we are going to tackle a simple technique that you can use with a variety of projects!


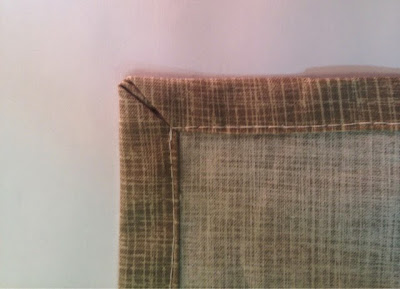
Perfectly mitered corners are used a lot in quilting, but can also be used to make napkins, placemats, cute pockets and even aprons to be sewn onto dresses. 

For this tutorial I used a piece of paper just to insure you could really see the fold lines. I even ran a pen over top of them so you can seeing them clearly. 

To start you want to press your edges in 1/4" and then again another 1/4". 


Unfold and then repeat this step with all your raw edges. 


Your corners will now have press lines that look like this. 


Now we are going to fold the corners down 3 times as shown below. 


 Next we are going to fold our edges in using the press lines we made in the 1st few steps.


And just like that you have your perfectly mitered edges! Now just pin them in place and topstitch 1/8" along the folded edges


Now you can go practice on some scraps so you'll be all ready and confident when it's time to do the real thing! It really is that easy. 

Happy Sewing Y'all, Morgan

Monday, August 18, 2014

Monthly Mash-up: Dahlia's and Lexie's

It's time for another Monthly Mash-up from Deborah Koch of Ma Cherie Kids, and this one is perfect for Back-to-School! Actually it is perfect for any time -- it's one of my favorite mashups ever!


Isn't it darling!?  The print is playful yet mature and I love the placement of the brightly colored chevron and polka dots!  Deborah used two of our best-selling new patterns and wow did they combine beautifully together! 


The patterns that Deborah mashed were Dahlia's Double Flutter Pocket Top and Dress (shown above) and...


Lexie's Retro Halter Dress (shown above). Each of these dresses are so fun on their own, and I love the vision that Deborah had to mix them together. Let's take a closer look at how she mashed the two patterns. 


First of all, she took the bodice of Dahlia's and did not make any alterations to it. Those flutter sleeves are so sweet in these colors! 


Here's the back view. Again, just so cute! 


Then Deborah used the skirt from Lexie's and kept it the same length as the dress pattern to create this adorable Top version, which is great for pairing with ruffled leggings for school. 


 If you want to make a top version like Deborah, guess what!  All of the CKC legging patterns are on sale for 25% off for today, 8/18/14!  You can see how adorable ruffled leggings are paired with a top like this and we have several styles to choose from.

Deborah recommends that if you want the mashup to be dress length, you can easily add a few inches to the top portion of the skirt when cutting. 


All of the fabric in today's mash-up came from Joann's, the necklace and bow are from Leopard Spots and Lizard Tails, and the adorable model, of course, is Deborah's own daughter. I think she is simply gorgeous.  Thank you again, Deborah, for another fantastic mashup! I think we will be having  a lot of our CKC friends try this one out. 

Let's Create!  ~ Kristen 

Thursday, August 14, 2014

Winners of the "Get Creative with Freebies" Contest


Last week we announced our mini contest here on the blog in which we challenged you to get creative with our freebies!  Contestants were allowed to use any of the free patterns on our Tutorials page here and then put their own spin on it to create something new. It has been SO fun to see the entries as they have come in and today I get to share the winners with you!  They had such great ideas and I'm sure they're going to spark new creativity in the rest of us! 


One of our winners is Alisha Annand, all the way from Australia! Here is what Alisha has to say about her entry: 

"My son's kindy has two little dolls that each go home with a child every week. There's a notebook for each doll, Barbara and Frank, so that the kids can tell a story about their visit with some photos. I used the free tote tutorial and made the bag a bit smaller to fit the notebooks perfectly, with a carrier pocket on the front for the dolls. Obviously it was just Barbara visiting our house this week and Batman was just a stand in for the picture." 

How brilliant is that?!  Aside from being a fantastic idea for the school kids, I know that each my own kids (even the 11-year-old) would love to have one of these for road trips. Thank you, Alisha, for sharing this with us! 

--------------------------------------------------------------------------------------------------


Our next winning entry comes to us from Grady Benedict, age 6!  He had some help from his mother (Kristen Benedict) of course, and I am super impressed!  Here is what his mom has to say about Grady's winning entry for the contest: 

"I don't know if any other parents have problems keeping kids' medication all packed together on a big trip. It never fails that one of the boys will have an asthma attack while we're away from home, and we seem to always grab the breathing machine but forget some of the parts.  So my sweet Grady came up with an idea to make a travel kit for our breathing machine! He used Colton's Crayon Roll, picked material, decided what size the pockets should be, and even sewed the kit together.  I helped by cutting the fabric, only because I'm such a control freak with my sewing scissors, but all else he did on his own. We hope someone else can use his idea!" 

Thank you, Grady and Kristen!  I'm sure this will come in handy for lots of other parents (and kids) as well! 

(Side note: I'm curious which pattern Grady will choose for his prize. I think he's earned something fun to wear to school, don't you?) 

----------------------------------------------------------------------


Our third winning entry in the contest is perfect for Halloween and absolutely fabulous!  This adorable outfit was created by Kristi Fitzpatrick.  She says:

"I used the Hannah's Pillowcase Romper.  I cut out the back and added a knit spiderweb!  I was itching to make something for Halloween!" 

How cool is that?!  Here's a closeup: 

I never would have thought to do something like that and now my mind is spinning with ways I can use Kristi's concept to make fun outfits and costumes for my kids!  Thank you, Kristi! 

__________________________________________________


Congratulations again to all three winners of our "Get Creative with Freebies" mini contest! You have each won a free CKC pattern of your choice! 

Thank you to the rest of our readers for your entries as well. We love seeing your creativity!  Be sure to keep an eye out for our next mini contest on the blog.  We have one every month.

Let's Create! ~ Kristen 


Wednesday, August 13, 2014

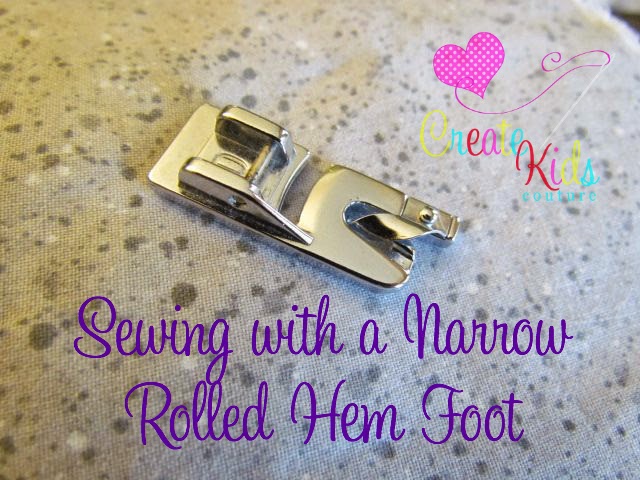
Sewing Tutorial: Narrow Rolled Hem Foot

Ever look at the feet that came with your sewing machine and just go ???? Well today I am going to teach you to use a VERY useful foot- the narrow rolled hem foot (some people call it narrow hem(mer) foot, some call it rolled hem(mer) foot, so I'll just combine the two for this tutorial)! This is a great foot for doing small hems- like on ruffles! :) And you know how we love our ruffles here. Even though I have a serger, I still choose to use this foot sometimes. This is great when you don't have the color wooly nylon you need, or when your ruffle is small and you don't feel like changing the threads and settings (not lazy at all). Also, some of the serger rolled hems I have done on the bottom of pant ruffles have become fuzzy, so I choose to do this on those ruffles, too.


As it turns out, there are two ways to use this foot! I have only used it for a narrow hem, but I learned about doing a rolled hem while talking to one of our fans in the group the other day.

NARROW HEM
 
Here is a picture of a finished narrow hem. Front:

 Back:


There are many ways to do the narrow hem, but this is what I prefer to do. First things first; let's get our machines ready. Put your narrow hem foot on, and change your stitch to the appropriate one. Here is what the stitch looks like on my machine:
 
Now, clean up your hemline- get rid of threads and make sure the weave is not coming undone along the hem. I like to cut off any thread trails you may have from sewing pieces together:
 
It is easiest if you iron the beginning and any seam. Take your fabric to the ironing board and fold 1/8", iron, then fold 1/8" and iron again in those two places (you can iron the whole thing if you want to be really precise and not worry about messing up, but if you follow my steps you don't need to. And not ironing sounds GREAT to me!).


Raise your presser foot and simply place the fabric under, lining it up with the needle in the right place. It's going to be pretty close to the top of your fold.

Lower your presser foot without inserting the fabric into the roll part. You are going to sew and backstitch with it out.

When finished, stop with the needle in the fabric. Now shimmy the fabric until the folded edge is feeding directly into the roll part of the foot.


You are ready to start sewing! You are going to use your right hand to maintain the roll. Just twist the fabric slightly making sure to keep it the same width as it is going through the foot.


 This is not enough- there is no roll:

And this is WAY too much:
 
 With your left hand you are going to want to make sure to pull the fabric taut. Not hard, just enough to keep it smooth and straight.

You can also use your nail to tuck the edge under if needed.
 
 I couldn't do both and take pictures, but ideally your left and right hand will both guide the fabric. Once you get to the end, you are going to repeat the steps from the beginning. Put your needle into the fabric, raise the foot, and take the fabric out of the roll part. Lower the presser foot and then finish sewing and backstitching. Ta-da!! You are done!


Now your front and back should look like the example in the beginning. If you didn't roll enough, you will have raw edge out like this picture:


For that you will need to get out your friend the seam ripper and try again in that section. If your roll was too wide, you will have a nice roll but underneath your raw edge will be sticking out.
 
Again, your handy dandy seam ripper can help you fix that!
 
Here is a video that shows all of this in action (y'all ignore my errant thread. Pull the thread behind your presser foot like normal- I was concentrating on talking and didn't even notice).


ROLLED HEM
 
Now, this is completely new to me. A fan posted that she did a rolled hem with a zig zag stitch, and I had to investigate! You can only do this if your foot has a big wide space that allows the needle to move side to side.
 
 
You can do this on regular woven, but this is apparently also a good technique for hemming flowing fabrics, like organza. It gives a hem without giving too much structure. You want the threads to encompass the whole hem (technically you can also use it as a decorative stitch on a narrow hem, too, as shown below. To accomplish that, just play with the placement of your zig zag. I used stitch width 1.5 and stitch length 1.5. Kinda cute, huh?). 


Ok, back to the traditional rolled hem. You will need to practice on scraps to see what stitch length and width you prefer. In this tutorial, I used a stitch width of 3 and a stitch length of either .6 or .8. I prefer the look of the .6 but thought you could see what your stitches are supposed to do better at the .8.
 

This is the inside of the garment at .8: It starts at the very top of the hem and then wraps all around the hem. It will not be piercing your roll at all. It's just giving it a nice big hug! :)
And this is how it looks with the .6 See how much fuller it is? I tried smaller but it was difficult on my machine- the feed dogs had a hard time pulling it. Try it on your machine if you would like! (Adds a cute pop of color when using contrasting thread, no?)

 This is the outside at .8:
And here's the .6:
 
 
You are going to do everything the same as you did with the narrow hem. This time, however, your job is to make sure that when the needle moves to the left of your roll, it misses the roll. When it moves to the right of the roll, it need to also miss the roll. It should go right next to it both times. :)

Here is a video on sewing a rolled hem with a zig zag stitch:


I hope this blog has helped you understand your rolled hem foot better! Give it a try, and let me know how it goes!

Happy sewing,
Courtney